
Hi coders, It’s a brief VueJS 3 Guide for beginners. And I’m going to explain basic concepts and terms of Vue.js 3.0. So, It’s a beginner guide to get started with Vue 3. Therefore, this article will be useful only if you’re a beginner.
I’m going to use CDN instead of a development setup. Because I’ll explain basic concepts of VueJs 3.
VueJs 3 Beginners Guide:
Vue is a progressive and light-weight javascript framework, which has mix power of both the giant framework(Angular and React).
So, we’re going to start with setting and creating our first vue app instance. So, without wasting any time, let’s start our VueJS 3 Guide.
Creating A Vue 3 instance:
First of all, we need to configure our vue.js 3 CDN script inside our HTML file. So, that we could use our Vue related functions to create Vue object. So, just add the following script below your body tag.
<script src="https://unpkg.com/vue@next"></script>You could also copy the tag from Vue.Js 3 official page (Click Here)
Now create a main.js(any js) file and then link it with your html file. So, that you could write your VueJs code there.
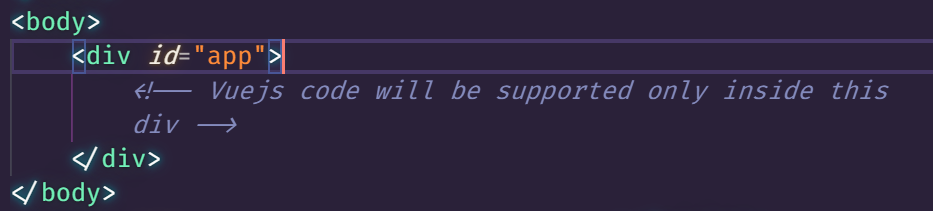
Now inside your Html body section. create a <div id=”app”>. Id could be anything. We’ve defined a div because In VueJs we control a part of HTML. that’s why we assign div with id.
So, when you will define vue js data, function. these all your vue related things will work only inside that div part. If you will try to use your vue data or anything outside that div then it will not work.
Creating our First Vue App
const app = Vue.createApp({
      // code
})

app.mount('#app')
In Vue.JS 3 we create our Vue instance by using Vue.createApp({…}) object and then we mount(‘id’) it. This mount function takes one argument, where you need to enter the id of that div or section, which html part you want to control.
Now, you successfully created you first vuejs 3 instance(app).
Understanding Vue.JS 3 basic terms
Now let’s move to the next topic, which is how to define data and methods into your vue app and also how to use them.
data()
We’ve data() function, Inside that you could define your data. Remember that, you could only define variables inside this data() function. We use : to assign value to our variables, e.g
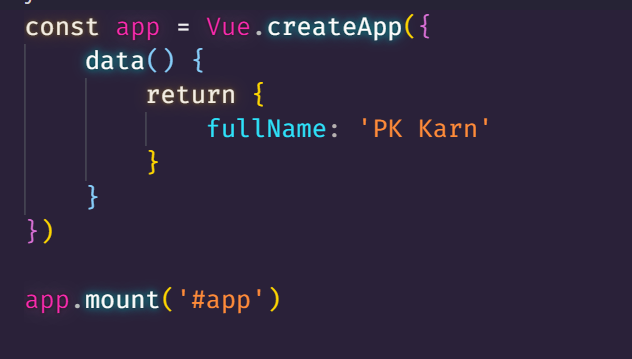
Above, Inside our Vue instance, we have a data function, which returns your variables. And now you can use your variable(fullName) into your Html template(inside that div with id=”app”).
To render this data inside html part you need to use {{var}}.
<div id="app">
<p>{{fullName}}</p>
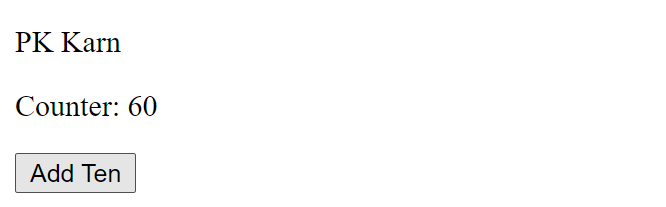
</div>Now, this will dynamically render your fullName, which is Pk Karn inside your <p> tag.
methods
We also have methods property, where you could define your function that would act upon some sort of events. Now let’s see how to define a function inside methods property and how to use it.
const app = Vue.createApp({
    data() {
        return {
            fullName: 'PK Karn',
            counter: 0
        }
    },
    methods: {
        addTen() {
            this.counter = this.counter + 10
        }
    }
})

app.mount('#app')
In the above code, we defined a variable counter for example. Right after our data() property we defined our methods: {……}, Inside this method property, you can define your function.
So, I defined a function addTen() which will add 10 to the existing counter. So, I want this function to be called whenever someone clicks a button. So, first you need to define a button inside your <div id=”app”> part.
In vue, we have v-directives that I will explain later. But, for now, we’re going to use v-on:click directive. Basically, you can put your vue methods inside this v-on:click property.

Now whenever someone will click on button then addTen method will be triggered and respectively that method It will update our counter variable. Which we rendering dynamically here {{counter}}.
Computed properties:
In vue controlled templated, you can define your vue data and logics inside {{expression}}. But sometimes writing too much logic within your template makes it harder to read. So, computed properties are those function which returns your defined logic. So, that you could use that expression in one word function inside your template.
Remember computed properties or functions are used to store complex logic, so that you could call them to render that logic in one word. whereas methods contain functions that act or triggered upon your actions,
Now, let’s try to understand this by an example.
Let’s assume you have someone date_of_birth and you want to directly render their age. First way to do it…
data() {
    return {
         fullName: 'PK Karn',
         counter: 0,
         date_of_birth: 1999 //
     }
},
<p>{{ 2021 - date_of_birth }}</p>Within our <p> tag, we have less logic here, but you could also imagine a situation where we might have complex logic. In that situation, you can’t use function(inside methods property). Because we’re not doing anything on a specific action. All we want to render this expression directly, but putting all the logic inside the template isn’t a good way to do it.
So, In vue, we have something called computed properties, where you also define a sort of function, but these functions will return the expression, after all the computation. Then you can directly call the computed function inside your template in just one word.
const app = Vue.createApp({
    data() {
        return {
            fullName: 'PK Karn',
            counter: 0,
            date_of_birth: 1999
        }
    },
    computed:{  //Computed Property
        age() {
            return 2021 - this.age
        }
    },
    methods: {
        addTen() {
            this.counter = this.counter + 10
        }
    }
})

app.mount('#app')
By the convention, you should always define your computed properties right before methods. In the above, you can clearly see that we defined our age() function inside the computed property. Now all you need to call them inside your template like this:
<p>{{ age }}</p>By just doing this, Now your code looks more readable and clearer.
Watchers:
We also have watchers in vuejs, well these watchers are useful in those situations, when you want to use async function these watchers act on data changes. Its most useful in those situations, when you want to fetch data from API.
In simple words, you define watch methods with the same name of that respective variable. And after that whenever that variable will change, their respective watch method will be executed automatically.
data() {
        return {
            fullName: 'PK Karn',
            counter: 0,
            date_of_birth: 1999,
      }
},

watch: {
        counter(value) {
            if(value == 50) {
                this.fullName = 'Nothing'
            }
        }
},
In the above code, we defined our watch method for counter variable, which means every changes for counter variable will trigger their respective counter watch method.
This watch method(counter) takes one argument, which is the value of itself, e.g value = this.counter. And now on every changes It will check counter value == 50, If it’s equal to 50 then It will assign new string to fullName variable.
So, basically watch methods are like watchers, which will act upon changes of their respective variables.
V directives in VueJS:
Now let’s talk about v directives in this VueJS 3 Guide. In vue, we have different directives that work differently, basically, these directives help you to bind your data directly inside your HTML dom and attributes.
Let’s discuss these directives one by one.
v-on directive:
V-on directive helps to listen DOM events all you need to attach your events and then you can use your data and methods inside that property.
All you need to put your event name after v-on e.g. v-on:event. Let’s try to understand it by example
As we saw earlier in this post, where we used our addTen() method inside our <button v-on:click=”addTen()”> tag. This means this v-on directive will trigger addTen() method on click event. As same, it works with all kind of events, you can attach any kind of event after v-on directive. And then inside that you could use your vue related things.
// In vue js
    data() {
        return {
            counter: 0
        }
    },
    methods: {
        addTen(){
            this.counter += 10
        }
    }


// Inside Html
<p>{{counter}}</p>
<button v-on:click="addTen">Add Ten</button>
v-bind directive:
This directive helps you to bind and use vue data, methods or related things inside your html attributes. Like we have html tags and inside that we have attributes : <a href=”https://longlineurlxxxxxxxxxxxxxxxx.com”>. So, here you can bind your href attribute with the v-bind directive. then store your url inside your data and directly call it inside this attribute.
//In Js
const app = Vue.createApp({
    data() {
        return {
            counter: 0,
            url: 'https://gameaxasieis-asadsd-sad.com/asdssas'
        }
    },
    methods: {
        addTen(){
            this.counter += 10
        }
    }
})

app.mount('#app')

// Now Inside HTML you can use url data inisde href property after  // binding it with v-bind

<a v-bind:href="url">Click</a>
So, basically with help you v-bind you can bind almost all kind of html attribute and then you can use your vue related things inside that attribute.
Two way binding with v-on:input and v-bind:value
And with help of these two v-on and v-bind directive you can achieve two way binding in your input field
// Inside HTML
<div id="app">
    <p>{{message}}</p>
    <input type="text" v-on:input="UpdateMessage" v-bind:value="message">
</div>


// Inside JS
const app = Vue.createApp({
    data() {
        return{
            message: '',
        }
    },
    methods: {
        UpdateMessage(e){
            this.message = e.target.value
        }
    }
})

app.mount('#app')
In this above code, we bind our input value with message data (v-bind:value=”message”) and we listens UpdateMessage on input event(v-on:input=”UpdateMessage”). Which means every on each input it will trigger this function. And then this function will update message variable with latest value of that input(e.target.value). And then respectively it updates our value of message variable in HTML.
v-model
Now here we also have one directive that you could use instead of using all these two things. So, whenever you want two way binding then you can use your v-model directive, which works same what we just did with combining v-on:input and v-bind:value.
<div id="app">
        <input type="" v-model="message"><br>
        {{message}}
  </div>

// IN JS

const app = Vue.createApp({
    data() {
        return{
            message: '',
        }
    },
})

app.mount('#app')
In this above code, we used the v-model inside our input field and that’s it. Now it will connect your message variable in that two way binding.

Shorthands: We also have shortands for our v-bind and v-on. You can use just :attr instead of v-bind:attr . And Instead of using v-on:events, you can use it like @events=””.
v-text:
we also have v-text, which works same as rendering variable inside html:
// Both will output the same result
<p>{{message}}</p> = <p v-text="message"></p>
v-html:
v-html renders html tags and output them inside html e,g.:
<input type="" v-model="message"><br>
<p v-html="message"></p>
VueJS Conditional and Loop
Now let’s start talk about the loop and condition in this VueJS 3 Guide We also have v-conditional directives e.g. v-if, v-else, v-for, etc. Now let’s explore this one by one.
V-if and V-else:
V-if and else is conditional directives, inside these directives you can define your condition, if that condition will be true It will render that tag. And If the the condition will be false then it will remove that whole particular tag.
Let’s try to understand it with an example:
//JS
Vue.createApp({
data() {
return {
message: "You're adult"
}
},
}).mount('#app')Vue.createApp({
data() {
return {
age: 0,
}
},
}).mount('#app')
//In Html:
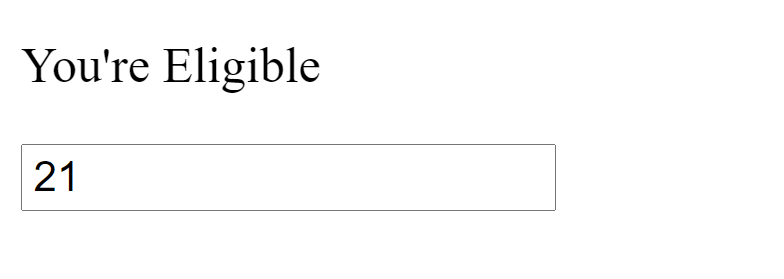
<div id="app">
<p v-if="age > 18">You're Eligible</p>
<p v-else>You're not Eligible</p>
<input type="text" v-model="age">
</div>
In the above code, you can see that We declared our age variable and then bind it with input using v-model. And then Inside HTML, we declared two paragraph, where we have used our V-if, esle directives.
When our age would be greater than 18 then first paragraph will be render, otherwise second paragraph with v-else directive will render.
Similarly, you can use v-else-if statements.
V-for:
We have V-for directives that helps you to loop items from any iterable object inside html element. Let’s try to understand with an example:
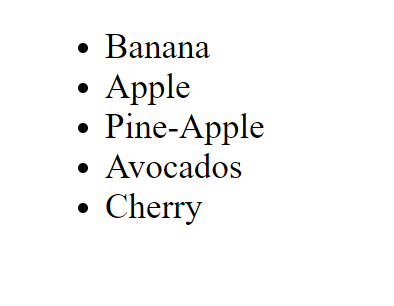
Vue.createApp({
    data() {
        return {
            fruits: ['Banana', 'Apple', 'PineApple', 'Avocados', 'Cherry']
        }
    },
}).mount('#app')

// In HTML

<div id="app">
     <ul>
         <li v-for="fruit in fruits">{{fruit}}</li>
     </ul>
</div>
In the above code, we declared an array of fruits. and then inside html, we rendered it with v-for directive. Where in each loop it will take one item from array and then it will render that item inside Html tag.
You may also like: Arrow Function in Modern JavaScript ES6
So, I hope you all liked this Guide on VueJS 3. If yes the please don’t forget to share this article with your friends. You can also subscribe to our blog via email to get notifications from this blog.
Thanks to read…